Ie no Yoshikuri
Beginning Kumihimo

Home

News
Members
Research
A&S
Books
Links

a beginner's guide to kumihimo

kumihimo

 
Kumihimo means "the gathering of threads", and in Japanese refers to all types of braiding. Primary historical uses include armour lacing, use in Buddhist rituals, and tying and trimming scrolls.

There are two main types of Kumihimo Harahimo (flat braid) and Maruhimo (round braid). Within these broad groups, hundreds of subtypes of braids exist, named after their pattern or traditional usage. Braids range from 4 to 288 strands thick, and different looms are used depending on what type of braid is being constructed.

The earliest braids were made completely by hand, without the use of any tools. Recent research suggests loop manipulation methods were still used in making cord for armour lacing even after looms were developed. A good loom for beginners is the Marudai (round stand). It is simple and relatively cheap to construct, and can be used for round or flat braiding.

making a round braid

Making a basic round braid

~ Cut out a circle of cardboard, approximately 8 inches in diameter. Make 12 or more evenly spaced slits around the outside of the circle. Cut a smaller circle inside. This will be your loom.

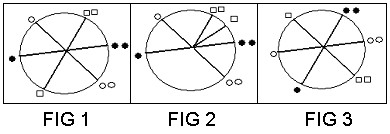
~ (Fig 1)Choose 3 colours of embroidery floss. Cut two lengths of each colour and tie them together at one end. With the knotted end in the centre of your loom, position the strings so that string 1 and string 2 of each colour are across from each other.

~ (Fig 2) Move string 1 of a colour up and to the right of string 2.

~ (Fig 3) Move string 2 across to where string 1 used to be. Rotate your loom one string counterclockwise.

~ Repeat this process with each set of strings, continuing to move your loom in a counterclockwise direction. It is important to keep tension in your strings so that the resulting cord is even.

This pattern can be used with any number of strings. Experiment with different weights of string to experience the variety even this simple pattern can produce.